Below is a brief excerpt about the Deconstruct Reconstruct exercise featured in Chapter 10 of Teaching Digital Photography: The Ultimate Guide to ‘Tween and Teen Learning by Keith Kyker (Libraries Unlimted, 2014)
Images are inserted to illustrate the concepts. You can click on each image to enlarge it.
================================================
From Chapter 10 of Teaching Digital Photography: The Ultimate Guide to ‘Tween and Teen Learning by Keith Kyker (Libraries Unlimted, 2014) All rights reserved.
Practicing Layout Skills—the Deconstruct/Reconstruct Exercise
A good digital layout project has two aspects—the creative aspect and the technology aspect. In this chapter, I have described a good method for teaching the technology aspect of digital layout. Now, it is time for students to practice this technology aspect. In order to focus on technology, we need to remove the creative aspect. We do this by using a pattern—an existing example of digital layout.
I call this exercise Deconstruct/Reconstruct (or De/Re for short). This exercise achieves three goals: (1) it teaches students to realize the individual elements of any layout project, (2) it provides a simple, yet positive example of layout work, and (3) it provides a good opportunity for students to practice the technology aspects of digital layout work without having to concentrate on the creative aspect. You can think of Deconstruct/Reconstruct as a digital layout project with training wheels.
Before You Begin
Before you begin the Deconstruct/Reconstruct project, you need to obtain a simple, professional example for the students to deconstruct, and then reconstruct. I prefer a visitor’s guide, for reasons you’ll see later on in this section. Most local chambers of commerce print a visitor’s guide, and many can even be downloaded online. Visitor’s guide covers are usually eye-catching, bold, and simple in design—perfect for our Deconstruct/Reconstruct exercise. Start looking around now and find a simple visitor’s guide cover that your students can emulate.
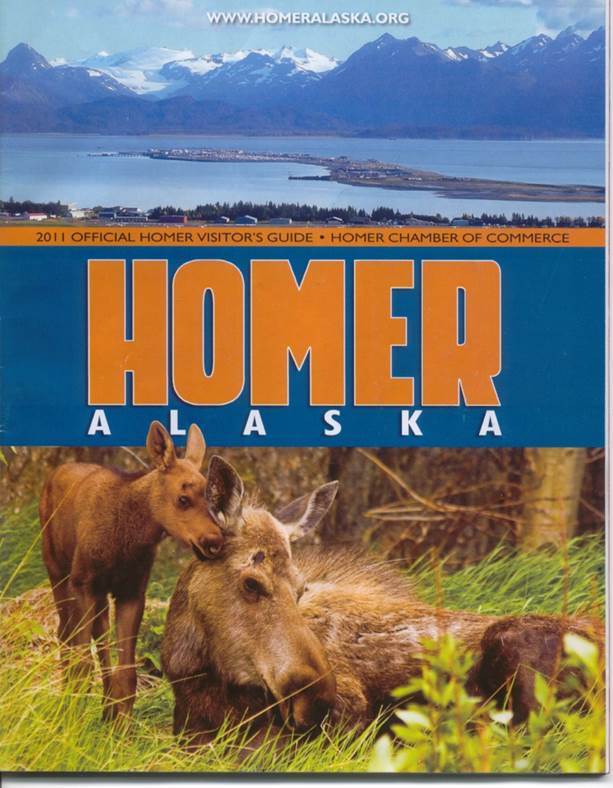
A few years ago our family took a vacation to Alaska, and we ordered the visitor’s guide from the Homer, Alaska Chamber of Commerce. Over the past few years the Homer Visitor’s Guide cover images have changed, but the layout has remained the same. So, if you really need a good example, you might want to Google “Homer Alaska Chamber of Commerce.” I believe they have an electronic version of the guide, which may also work well for you. You can request a copy of the guide, and it will probably arrive in a couple of weeks. Of course, depending on when you’re reading this book, the guide design may have totally changed. But—it’s a starting point. (By the way, Homer is a great place to visit! I highly recommend vacationing there.)
Of course, this project will work with any simple visitor’s guide. Visit your local chamber of commerce or travel agent office, and you will probably find something that will work.
Note: As a digital photography teacher, you should begin collecting examples for your students to study and emulate. Most mailboxes are stuffed with catalogs, especially during the holidays. If you see something and think, “Hey, my students can do that!” then save it. You can probably use it as a class example. If you have a scanner, scan the example. That way, you can display it using a data projector. In my class we complete two Deconstruct/Reconstruct exercises—the visitor’s guide and the catalog. You might decide to repeat this exercise more often. So, start collecting examples for your professional use.
Step 1: Deconstruct
First, you will guide your students through the “deconstruction” of a professional layout example. (I used the Homer, Alaska visitor’s guide.) Display your professional example using your data projector and/or provide it for close-up viewing on their computer screens.
Have the students “deconstruct” the professional example by naming and describing the individual elements that make up the visitor’s guide. Depending on your teaching style and your rapport with the class, you can complete this task as a class discussion, or as a paper-and-pencil assignment. Require the students to accurately describe the elements using digital imaging terminology, such as, “I see a shape, a rectangle, color orange, with a small black stroke,” and “I see a picture of a bald eagle, cropped to a rectangle.”
Make sure that all of the elements are described, down to the smallest shape. If the cover is opened in Adobe Photoshop Elements or a similar program as a JPEG, the students can use the Ruler display to measure the size of each image. The goal here is to recognize that all professional layout work is simply the combination of various elements—elements that the students themselves can create and manipulate!
Step 2: Reconstruct
Now that the students have successfully deconstructed the professional example, they are going to reconstruct it on their computers. The difference is that they are going to make a visitor’s guide for their school (or neighborhood, or city—the choice is yours as the teacher.) This is why I select a visitor’s guide as my professional example. We will follow the professional example and create a facsimile cover using our own photos, shapes, and text.

The main elements that make up the professional example—photos, text, shapes, and so on—must also be found on their new guide. The school/neighborhood/town photos replace the photos on the professional example. The dimensions of the photos should be the same as those they are replacing. The students can certainly make a few changes (fonts, colors, etc.), as long as the basic layout is the same. Your more advanced students will certainly “jazz up” their visitor’s guides.

As the teacher, I always provide the images for the students to work with on this Deconstruct/Reconstruct project. I provide more images than the students need, and they can choose from my small collection. In this exercise I want the emphasis to remain on the layout skills, and I do not want to take the time for the students to walk around taking pictures.

Follow-up
As a follow-up activity, collect magazines with more complex covers from the school library media center. Have students deconstruct the covers and list the elements on a notecard. This can be collected for a grade.
==========================================================================
Notice: this web-page, all text, all images, and all instructions are copyright 2014 Keith Kyker. Read it. Learn from it. Link to it. Use it as a teaching tool with students enrolled in your class. But do not copy it and/or claim it as your own work. Thank you.